Well you may remember I started stitching the blocks in Red Brolly's Catalicious BOM way back in February 2010 with the intention of making a runner for the end of our bed, where the cat sleeps . . . (looking at the picture I should just point out that the blocks are big - about 18" square - but the cat is not)
It's finally finished!
But . . .
It hasn't quite made it to the end of the bed.
Since it was "just" for the end of the bed and "just" for the cat (sorry Squeaker) . . .
I used what I had on hand to finish it off. So it's got a piece of Minky fabric left over from another project for the lining. And it's backed with chenille (different coloured pieces joined together to fit) and bound with leftover binding too.
But then . . . it's turned out to be the most comfy quilt to use while we're sitting on the lounge - soft and cosy and snuggly! So for now it's the go-to quilt on the cold evenings. The end of the bed will just have to wait!
Pattern: Catalicious Block of the Month
Designer: Bronwyn Hayes
Publication: http://www.red-brolly.typepad.com/
Saturday 28 May 2011
Catalicious Complete
Labels:
Cat,
Catalicious,
Patchwork Blocks,
Stitchery
Tuesday 24 May 2011
Civil War Quilts - Blocks 18, 19, 20 & 21
Well I had a bit of catching up to do . . .
Block 18 - Union Square
Block 19 - Missouri Star and
Block 20 - New England Block.
This week's block - 21 - is Underground Railroad. It was pretty quick to piece. Once again, the choosing of the fabric took longer than the stitching!!! I've added the pink because the pink in Block 8 - Cotton Boll - still visually dominates, so this is to help balance it up in the overall scheme of things.
Now I'm back on track!
Pattern: Civil War Quilts - Block 18 - Union Square
Pattern: Civil War Quilts - Block 19 - Missouri Star
Pattern: Civil War Quilts - Block 20 - New England Block
Pattern: Civil War Quilts - Block 21 - Underground Railroad
Designer: Barbara Brackman
Publication: http://civilwarquilts.blogspot.com/
Labels:
Civil War Quilts,
Patchwork Blocks
Saturday 21 May 2011
Canvas Work Pin Cushion
What could be better than spending a day stitching with a group of like-minded ladies? That's exactly what I did at the Stitching On The Lake day, hosted once again by Sylvia and Fiona.
The day begins with a wonderful bag of goodies - kits for 6 lovely stitching projects.
Then the dilemma . . . which one to do first!
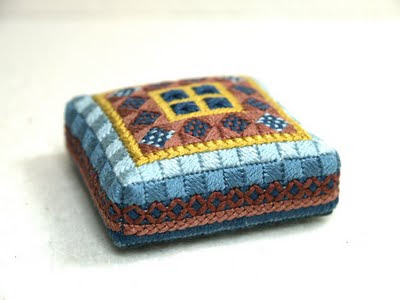
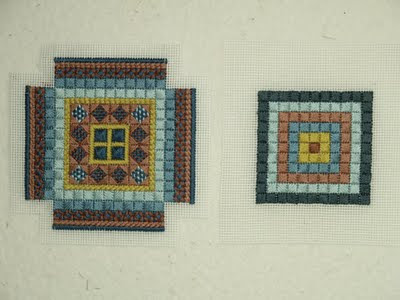
I decided to do this canvas work pin cushion because I hadn't really done this sort of thing before and thought I'd give it a try.

For some reason it took me a while to get my head around it. I don't know why. I mean, I don't have any trouble with counted cross stitch, but getting started and counting correctly on this one took its toll. I unpicked the centre a couple of times due to mis-counting, but then, once I got going I was alright!

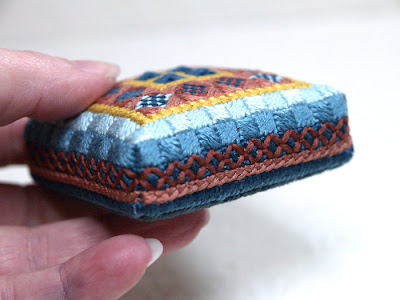
I chose colours that looked a bit Civil War era to me in the thread box, but the end result feels more Moroccan! I'm really pleased with the end result. The little band around the sides looks like a hat band. The 2 stitches are rice stitch and long legged cross stitch - I really like the braid effect with that one I must say. The whole thing is quite petite at just 2 1/2" square, which I think adds to the appeal.

I don't think this is the end of my canvas work adventure . . . more like just the beginning!
Pattern: Canvas work Pincushion
Designer: Peaceful Threads By Fiona
Publication: http://peacefulthreads.blogspot.com/
The day begins with a wonderful bag of goodies - kits for 6 lovely stitching projects.
Then the dilemma . . . which one to do first!
I decided to do this canvas work pin cushion because I hadn't really done this sort of thing before and thought I'd give it a try.

For some reason it took me a while to get my head around it. I don't know why. I mean, I don't have any trouble with counted cross stitch, but getting started and counting correctly on this one took its toll. I unpicked the centre a couple of times due to mis-counting, but then, once I got going I was alright!

I chose colours that looked a bit Civil War era to me in the thread box, but the end result feels more Moroccan! I'm really pleased with the end result. The little band around the sides looks like a hat band. The 2 stitches are rice stitch and long legged cross stitch - I really like the braid effect with that one I must say. The whole thing is quite petite at just 2 1/2" square, which I think adds to the appeal.

I don't think this is the end of my canvas work adventure . . . more like just the beginning!
Pattern: Canvas work Pincushion
Designer: Peaceful Threads By Fiona
Publication: http://peacefulthreads.blogspot.com/
Labels:
Canvas Work,
Pin cushions
Tuesday 10 May 2011
Hugs and Kisses
A gift was in order for a special little girl . . . and she definitely feels the cold.
So, at this time of year in Australia . . . a heat pack it is!

I made a slip cover (just like a pillow case) with thin wadding and some raw-edge applique.
The heat pack itself inside is just a simple bag, filled with rice and stitched closed across the top.
It slips inside the cover . . .
Gets heated in the microwave . . .
And there you have it. A little bit of warmth . . .
And hugs and kisses too!

So, at this time of year in Australia . . . a heat pack it is!

I made a slip cover (just like a pillow case) with thin wadding and some raw-edge applique.
The heat pack itself inside is just a simple bag, filled with rice and stitched closed across the top.
It slips inside the cover . . .
Gets heated in the microwave . . .
And there you have it. A little bit of warmth . . .
And hugs and kisses too!

Labels:
Applique,
Raw-edge applique
Saturday 7 May 2011
Early Mother's Day & The Rajah Quilt
We celebrated Mother's Day a day early, to fit in with life going on around us . . . and what a lovely day it was.
We started by meeting up with Mum for morning tea at a great tea house called Adore Tea. They have over 200 different types of tea . . . we sampled a few of them, with Turkish Delight being the winner for us today.

These guys are the reason I get to celebrate Mother's Day - Number 1 Son, who is a gentle, giant, bear of a man, with a very, very dry sense of humour, and Number 1 Daughter, who has a smile that lights up a room and the most infectious laugh I know.

So we shared tea, hot chocolate, scones and Poffertjes. I would have shown a picture of those, but we indulged before I thought about photos, so this is what I can show . . .

Then, the kids joined me for a visit to the National Museum of Australia to see the "Not Just Ned" Exhibition - A True History of the Irish in Australia. The main thing I wanted to see at the exhibition was the Rajah Quilt, and it was amazing! A true testament to the generosity of spirit of our kids, they were infinitely patient while I viewed the quilt (which I'm sure took about 200 times longer than they would have hoped!!).
At 325cm x 337cm (128" x 132.5") the sheer size of the Rajah Quilt is impressive. But when you consider that this quilt was made by convict women on board the ship "The Rajah" during their 3 1/2 month journey from England to Australia in conditions beyond imagination, the end result is astounding. A broderie perse medallion is surrounded by no less than 12 borders, most pieced, some appliqued. To see what was achieved by these women in 1841 in the hull of a convict ship with limited skills and supplies makes me feel like anything is possible . . . all that's needed is determination and perseverance. All the mod-cons and fancy tools are just a bonus!
If you ever get a chance to see this quilt, I promise you you won't be disappointed.
"Making the decision to have a child is momentous. It is to decide forever to have your heart go walking around outside your body."
Elizabeth Stone
We started by meeting up with Mum for morning tea at a great tea house called Adore Tea. They have over 200 different types of tea . . . we sampled a few of them, with Turkish Delight being the winner for us today.

These guys are the reason I get to celebrate Mother's Day - Number 1 Son, who is a gentle, giant, bear of a man, with a very, very dry sense of humour, and Number 1 Daughter, who has a smile that lights up a room and the most infectious laugh I know.

So we shared tea, hot chocolate, scones and Poffertjes. I would have shown a picture of those, but we indulged before I thought about photos, so this is what I can show . . .

Then, the kids joined me for a visit to the National Museum of Australia to see the "Not Just Ned" Exhibition - A True History of the Irish in Australia. The main thing I wanted to see at the exhibition was the Rajah Quilt, and it was amazing! A true testament to the generosity of spirit of our kids, they were infinitely patient while I viewed the quilt (which I'm sure took about 200 times longer than they would have hoped!!).
At 325cm x 337cm (128" x 132.5") the sheer size of the Rajah Quilt is impressive. But when you consider that this quilt was made by convict women on board the ship "The Rajah" during their 3 1/2 month journey from England to Australia in conditions beyond imagination, the end result is astounding. A broderie perse medallion is surrounded by no less than 12 borders, most pieced, some appliqued. To see what was achieved by these women in 1841 in the hull of a convict ship with limited skills and supplies makes me feel like anything is possible . . . all that's needed is determination and perseverance. All the mod-cons and fancy tools are just a bonus!
If you ever get a chance to see this quilt, I promise you you won't be disappointed.
"Making the decision to have a child is momentous. It is to decide forever to have your heart go walking around outside your body."
Elizabeth Stone
Labels:
Applique,
broderie perse,
Family,
Rajah
Tuesday 3 May 2011
Crown Bag
Inspired by our night of royal-ness and wedding-watching, I decided to make a crown bag. Not that I have a crown to go in it or anything, but you never know!!
This is a really simple bag to make up. I've made it in several sizes now, from about 4 inches square up to about 10 inches square. The little ones are cute, but for usability, I think 7 inches is good.
So, I start with 5 squares of the same size . . . 7" x 7" for the outer, and the same for the lining.

I drew up a crown and used vliesafix to attach the crowns, ready for raw-edge applique.

I really like the sketchy look of straight stitch, raw-edge applique. When I am doodling or sketching I invariably find myself drawing over the same lines more than once, so the look of this stitching style suits me . . .

Once all the embellishment to the side squares is done, I join one side at a time to each side of the bottom square. Then stitch the side seams from the top edge to the bottom corner. I do the same for the lining, leaving an opening on one of the side seams for turning through.
I make 2 loops, 1 each (about 3" long) for opposite sides and a long strip (about 20" long) for the handle, which is attached at the other pair of opposite sides . . . so all 4 sides have something attached to them. On the smaller bags I've found using ribbon for the loops is really good. I pin the loops and handle right side out, facing down, to the outer bag squares and pin or tack them in place. Then I put the bag outer inside the lining, right sides together and stitch around the top edge, making sure to catch the loops and handles in the seam.
Turn the bag right side out through the opening in the lining side seam. Hand stitch the opening closed and voilà . . .

one cute and useful little bag - in all its "crowning glory". Slip the handle through each of the side loops, pull it up to close the bag and you're good to go!

If crowns aren't your thing, these bags are a nice way to try a new block or use some of your "just had to have it" fabric. The options are limitless!

Pattern: Crown Applique
Designer: Sue Hampson
This is a really simple bag to make up. I've made it in several sizes now, from about 4 inches square up to about 10 inches square. The little ones are cute, but for usability, I think 7 inches is good.
So, I start with 5 squares of the same size . . . 7" x 7" for the outer, and the same for the lining.

I drew up a crown and used vliesafix to attach the crowns, ready for raw-edge applique.

I really like the sketchy look of straight stitch, raw-edge applique. When I am doodling or sketching I invariably find myself drawing over the same lines more than once, so the look of this stitching style suits me . . .

Once all the embellishment to the side squares is done, I join one side at a time to each side of the bottom square. Then stitch the side seams from the top edge to the bottom corner. I do the same for the lining, leaving an opening on one of the side seams for turning through.
I make 2 loops, 1 each (about 3" long) for opposite sides and a long strip (about 20" long) for the handle, which is attached at the other pair of opposite sides . . . so all 4 sides have something attached to them. On the smaller bags I've found using ribbon for the loops is really good. I pin the loops and handle right side out, facing down, to the outer bag squares and pin or tack them in place. Then I put the bag outer inside the lining, right sides together and stitch around the top edge, making sure to catch the loops and handles in the seam.
Turn the bag right side out through the opening in the lining side seam. Hand stitch the opening closed and voilà . . .

one cute and useful little bag - in all its "crowning glory". Slip the handle through each of the side loops, pull it up to close the bag and you're good to go!

If crowns aren't your thing, these bags are a nice way to try a new block or use some of your "just had to have it" fabric. The options are limitless!

Pattern: Crown Applique
Designer: Sue Hampson
Labels:
Applique,
bags/baskets,
Raw-edge applique
Subscribe to:
Posts (Atom)


